Tuesday 18 October 2016

How to unlock and reset SAP user in Oracle

REQUIREMENT:
SAP Basis Administrator locked the user SAP* to avoid misuse and also for the auditing purpose.
In some scenarios like client copy, it would be required to use the user SAP* to access the system. 
To achieve this, it is required to unlock and reset the SAP* user in oracle.

STEPS TO BE PERFORMED TO UNLOCK & RESET SAP* USER

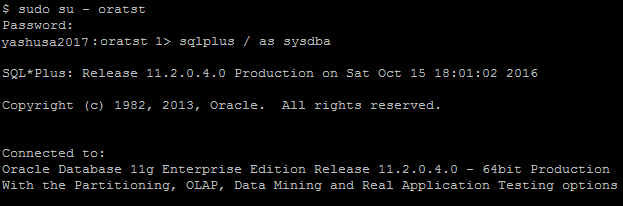
[1] Login with the OS user "ora<SID>" (Ex: oratst) and connect to sqlplus
  • sqlplus / as sysdba

[2] Search for the SAP schema used
  • select OWNER from DBA_TABLES where TABLE_NAME='T000';

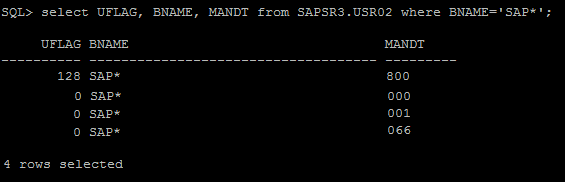
[3] Display the uflag and client details from the usr02 table for the user sap*

Note:    (a) UFLAG = other than ‘0’ means account is locked
  (b) UFLAG = 0 means account is not locked

  • select UFLAG, BNAME, MANDT from SAPSR3.USR02 where BNAME='SAP*';

[4] Unlock the SAP* user in the client where it’s locked (from above example, sap* user is locked in the client 800)

  • update SAPSR3.USR02 set UFLAG=0 where BNAME='SAP*' and MANDT=800;

[5] Reset the SAP* password by deleting the relevant row

  • delete from SAPSR3.USR02 where BNAME='SAP*' and MANDT=800;

[6] Set the parameter "login/no_automatic_user_sapstar=0" in default profile      (default.pfl)

Note: This can be done at OS level or from SAP level (RZ10)

  • Change the value from 1 to 0


Note: Information of the parameter “login/no_automatic_user_sapstar”


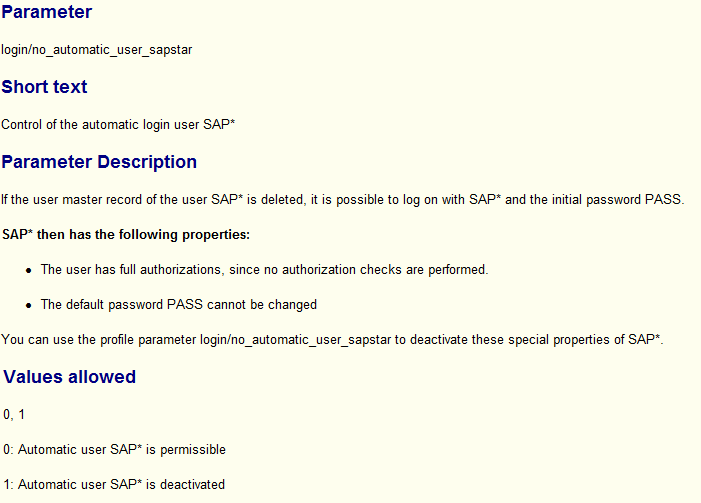
[7] Finally perform the SAP system restart so that above parameter change will be effective

[8] Now we can access the SAP system with user SAP* and password PASS

Saturday 15 October 2016

Difference between System Copy and System Refresh

SYSTEM COPY:
To build a new SAP system (demo/test/training purpose) similar to Production system data. System copy can be of 2 types.
There won’t be any changes made in source system.

[1] Homogeneous system copy:
If the source and target systems are running on the same operating system (OS) and database (DB)
[2] Heterogeneous system copy:
If the source and target systems are running on the different operating system (OS) and database (DB)

SYSTEM REFRESH:
Update the existing system data with production data (The target system should be up and running)

Create new test/demo systems                Update existing system with latest data

Thursday 29 September 2016

What is SUDO in Unix/Linux

What is SUDO

1.    SUDO : Substitute & Do
2.    SUDO is a program in Unix/Linux which allows you to run the commands with the other users’ privileges according to a pre configuration in sudoers file .
3.    By default sudo substitutes root (Super user) and executes the commands followed by it.
4.    It refers /etc/sudoers file (Explained below) for sudo command execution to enforce the security.

SUDO setup

1.    /etc/sudoers file is the configuration file which sudo program reffers each time when it’s called.
2.    In order to have the sudo commands working the same should have been updated in the sudoers file correctly.
3.    For making our SAP files working there were few entries made in the sudoers file.
4.    This entry was made by the Linux/Unix team based on our inputs. 

Wednesday 28 September 2016

How to delete an index in SAP

To delete an index.

1> Goto SE14 tcode
2> Enter table name choose tables
3> Select 'Edit'
4> In tools bar select Indexes (F5)
5> Select the indexes one by one
6> Select delete index

Note: You can not delete Primary index from database because it is related with primary key and foreign key concept of RDBMS

Monday 26 September 2016

ABAP DUMPS (ST22) ANALYSIS IN SAP


NAME OF RUNTIME ERRORANALYSISSOLUTION
DBIF_RSQL_SQL_ERROR1.An SQL error occurred when accessing a table.Might be the database system detected a deadlock and avoided it by rolling back
your transaction. If possible (and necessary), repeat the last
database transaction in the hope that locking the
object will not result in another deadlock.
DATA volume is high and the number of sessions triggered were more which led to Deadlock User has schedule the jobs in a smaller data volume with a time period in later schedule and got completed successfully. Release the lock (Need DB02 for analysis not available for offshore.)
TIME_OUTTime limit exceeded.Some ABAP program has exceeded the maxim
permitted runtime.
This error can be avoided by educating the user to schedule the job in background instead of Foreground.(Since it is a business decision to limit the Dialog time limit to 1800 sec).
Offshore basis team send mails peridocally to educate end users to schedule the job in background
We can send the mails to the functional team to analyze why the reports are run in Dialog mode
SYSTEM_CANCELEDThe current program has been terminated by another mode, e.g. with transaction SM50 ,The program "SAPLSCD0 " was terminated manually and no error elimination is necessary.. terminated by user
POSTING_ILLEGAL_STATEMENTStatement "COMMIT" is not allowed in this form.This is due toError in ABAP application program.
.
This happened only one day in the last week. User scheduled program which does not permit the commit in the specified form.SAPOP4 should to work with ABAP technical team.
More analysis about the failed jobs could be broken in to functional areas and sent to functional support team and scheduler for further action.     - Need clarification if it is required RnR from basis team as the dump is available for all.
SAPSQL_INVALID_FIELDNAMEOne of the field names in the SELECT clause was not recognized.This also due to Error in ABAP application program.
.,
It is Program error ABAP team has to resolve.
More analysis about the failed jobs could be broken in to funcational areas and sent to functional support team and scheduler for further action. - Need clarification if it is required RnR from basis team as the dump is available for technical team
DYNPRO_SEND_IN_BACKGROUNDScreen output without connection to user.It is Program error ABAP team has to resolve.
Basis team can provide the job details to ABAP team to resolve the issue - Need clarification if it is required RnR from basis team as the dump is available for technical team
SYSTEM_CORE_DUMPEDAn SAP System process was terminated by an operating system signal.

Possible reasons for this are:
1. Internal SAP System error.
2. Process was terminated externally (by the system administrator). -
Terminated by user
MESSAGE_TYPE_XAn error occurred when the system tried to process the commands
from the Automation Queue on the presentation server.
There are several possible reasons for this:
- The installation of the SAP GUI on the presentation server is
faulty or obsolete.
- There is an error in the application program
- There is an error in the SAPGUI or an integrated control
We have suggest the user to re-Install the SAP GUI upon receipt of trouble ticket
CONVT_NO_NUMBERUnable to interpret "*0 " as a number. It is Program error, ABAP team has to handle the exceptions better. Basis team can provide the job details to ABAP team to resolve the issue - Need clarification if it is required RnR from basis team as the dump is available for technical team
COMPUTE_BCD_OVERFLOWAn overflow has been determined in the current arithmetical operation
containing operands of type P. Possible causes include:
1. The results field of type P is to small and the result does not fit
into it.
places.
2. The result or partial result has more than 31 decimal places.
User has to send the correct variant.
Basis team can provide the job details to end users - Need clarification if it is required RnR from basis team as the dump is available for user

Sunday 18 September 2016

What is RFC and how to create RFC in SAP SM59

  • For business applications, it is essential to communicate and exchange information with other systems. SAP has provided a well defined mechanism called RFC (Remote Function Call) to enable this communication.
  • RFC Connections in SAP system are used to establish connection with another SAP system or non-SAP system.
  • SM59 transaction code is used to create RFC (Remote Function Call) connection.
  • There are different types of RFC connections available in SM59 transaction code.
We mainly used to create 2 types of connections in SM59.

  1. ABAP Connections (Type 3)
  2. TCP/IP connections (Type T

STEPS TO CREATE RFC CONNECTION

  1. Select 'Create' icon
  2. Provide RFC connection details
  • RFC Destination: RFC connection name
  • Connection Type: For example 3 or T
  • Description: Any short description, purpose of the connection
  1. Save the RFC connection

NOTE:
Once the RFC connection is saved, it will take us to the tab 'Technical Settings'.

Technical Settings
  • Load balancing
Select Yes, if load balancing is configured in system, else
Select No
  • Target host: Either Hostname or IP address of the target system
  • System Number: System number of the target SAP system

There are 5 tabs available, in which it is required to fill few of the target system details.

  1. Administration:

No input is allowed. It just provides the information on who created/modified the RFC and also the corresponding Date/time.

  1. Technical Settings: As explained above

  1. Logon and Security:

  • Language: Target system language, most of the time it's EN
  • Client: Target system client number 
  • User ID and Password: User details of Target system

NOTE: 
  • In general, RFC users can be of any user type
  • For security reasons, it is recommended to use only system users for RFC communications, to avoid access to dialog processes.

  • Security options:
  • Default setting for 'Trusted System' is 'No'.
  • If we need the Trusted RFC connection, select 'Trusted System' as 'Yes'.
  • This means, the trusted system doesn't need a password to connect with trusting system
  • Trusted system = calling system = Source system
  • Trusting system = called system = Target system

Some of the features of this option:
  • It provides Cross-system SSO (Single-Sign-On) capability
  • Password does not need to be sent across the network
  • User-specific logon details of the calling system is checked
  • Time-out mechanism for the logon data prevents mishandling of logon data

  1. MDMP & Unicode:

  • On a Non-Unicode system, the settings under this tab are disabled and no changes are allowed.
  • This setting is valid only on an UNICODE system, we have to specify the Unicode settings.

NOTE:
If the SAP system is upgraded from Non-Unicode to Unicode, we need to change the communication type to 'Unicode' on all the applicable RFC connections.

https://lh4.googleusercontent.com/JuwjOTT1OKLYYQa3u30VkOCTCycgvm1aOxFx8qHuKLmCfIufi0lVuwlPr9_Smr0q0_Py-fWGFgCtGSmz3zhRLEbUKxlt5QBCsrsHWaRuRDW_1KncyXpW6naenrLP98gdLxQ2K4a1U0rAGfa-lA

  1. Special Options:

This option is very rarely used.  For example

  • We can activate options for a trace and slow RFC connections.
  • To define qRFC


https://lh4.googleusercontent.com/sVK5mCWIdmP_C2SxFw7gZlSTbrjR-zVwHxEeNw6SgCgB5Oyoh2iInfxToSBY_FjerAhJSFiHKzDRN9jDjQqCr-q5Qz0mqanhdckl47fk0ZPeRtJqX-5UIavbv6tagGohs3TC7Nb7FDAKJSeDlg


TESTING THE RFC CONNECTION

  • Once all the necessary settings are made and the RFC connection is saved, final step is to make sure the connection is established successfully.
  • There are 3 types of connection tests are available.

  1. Connection test:    

This is the most important. This test is just to check if the calling system is able to reach the remote system. This authenticates the information provided in the RFC connection for target system.

  • If the connection is successful, it displays the table with response times. Else
  • An error will be displayed with the reason, and troubleshoot is required to fix the issue.

  1. Authorization Test:

This test validates the Client, User ID and Password (provided under 'logon and security' tab for the target system).

  • If the Authorization test is successful, it displays the table with response times. Else
  • An error will be displayed with the reason, and troubleshoot is required to fix the issue (check the logon details and authorizations)

  1. Unicode Test:

  • This checks if the Target system is an Unicode system or not

RELATED LINKS: