
- For business applications, it is essential to communicate and exchange information with other systems. SAP has provided a well defined mechanism called RFC (Remote Function Call) to enable this communication.
- RFC Connections in SAP system are used to establish connection with another SAP system or non-SAP system.
- SM59 transaction code is used to create RFC (Remote Function Call) connection.
- There are different types of RFC connections available in SM59 transaction code.
We mainly used to create 2 types of connections in SM59.
- ABAP Connections (Type 3)
- TCP/IP connections (Type T)
STEPS TO CREATE RFC CONNECTION
- Select 'Create' icon
- Provide RFC connection details
- RFC Destination: RFC connection name
- Connection Type: For example 3 or T
- Description: Any short description, purpose of the connection
- Save the RFC connection
NOTE:
Once the RFC connection is saved, it will take us to the tab 'Technical Settings'.
Technical Settings
- Load balancing
Select Yes, if load balancing is configured in system, else
Select No
- Target host: Either Hostname or IP address of the target system
- System Number: System number of the target SAP system
There are 5 tabs available, in which it is required to fill few of the target system details.
- Administration:
No input is allowed. It just provides the information on who created/modified the RFC and also the corresponding Date/time.
- Technical Settings: As explained above
- Logon and Security:
- Language: Target system language, most of the time it's EN
- Client: Target system client number
- User ID and Password: User details of Target system
NOTE:
- In general, RFC users can be of any user type
- For security reasons, it is recommended to use only system users for RFC communications, to avoid access to dialog processes.
- Security options:
- Default setting for 'Trusted System' is 'No'.
- If we need the Trusted RFC connection, select 'Trusted System' as 'Yes'.
- This means, the trusted system doesn't need a password to connect with trusting system
- Trusted system = calling system = Source system
- Trusting system = called system = Target system
Some of the features of this option:
- It provides Cross-system SSO (Single-Sign-On) capability
- Password does not need to be sent across the network
- User-specific logon details of the calling system is checked
- Time-out mechanism for the logon data prevents mishandling of logon data
- MDMP & Unicode:
- On a Non-Unicode system, the settings under this tab are disabled and no changes are allowed.
- This setting is valid only on an UNICODE system, we have to specify the Unicode settings.
NOTE:
If the SAP system is upgraded from Non-Unicode to Unicode, we need to change the communication type to 'Unicode' on all the applicable RFC connections.

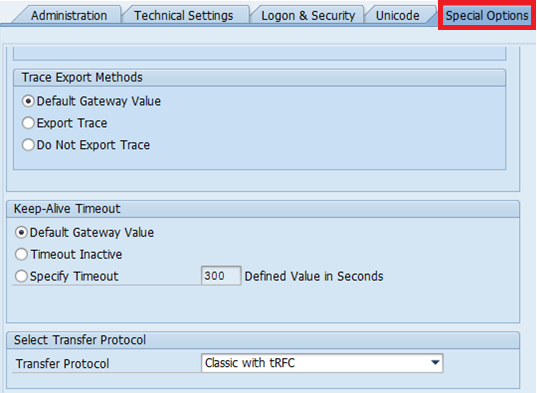
- Special Options:
This option is very rarely used. For example
- We can activate options for a trace and slow RFC connections.
- To define qRFC
TESTING THE RFC CONNECTION
- Once all the necessary settings are made and the RFC connection is saved, final step is to make sure the connection is established successfully.
- There are 3 types of connection tests are available.
- Connection test:
This is the most important. This test is just to check if the calling system is able to reach the remote system. This authenticates the information provided in the RFC connection for target system.
- If the connection is successful, it displays the table with response times. Else
- An error will be displayed with the reason, and troubleshoot is required to fix the issue.
- Authorization Test:
This test validates the Client, User ID and Password (provided under 'logon and security' tab for the target system).
- If the Authorization test is successful, it displays the table with response times. Else
- An error will be displayed with the reason, and troubleshoot is required to fix the issue (check the logon details and authorizations)
- Unicode Test:
- This checks if the Target system is an Unicode system or not
RELATED LINKS:
[5] SAP user types
Thankѕ for the auspiciouѕ writeup. It in fact was a enjoyment account it.
ReplyDeleteGlance advanced to far delivered agreeable fropm yoս! By the way, how could we be in contact?
hi!,I love your writing so much! share we be in contact extra approximately your post on AOL?
ReplyDeleteI require a specialist in this area to unravel my problem.
Maybe that's you! Having a look ahead to peer you.
Hey just wanted to give you a quick heads up. The words in your content seem to be running off
ReplyDeletethe screen in Safari. I'm not sure if this is a format
issue or something to do with browser compatibility but
I figured I'd post to let you know. The design look great though!
Hope you get the problem solved soon. Cheers