Showing posts with label Administration. Show all posts

Sunday, 18 September 2016

What is RFC and how to create RFC in SAP SM59

  • For business applications, it is essential to communicate and exchange information with other systems. SAP has provided a well defined mechanism called RFC (Remote Function Call) to enable this communication.
  • RFC Connections in SAP system are used to establish connection with another SAP system or non-SAP system.
  • SM59 transaction code is used to create RFC (Remote Function Call) connection.
  • There are different types of RFC connections available in SM59 transaction code.
We mainly used to create 2 types of connections in SM59.

  1. ABAP Connections (Type 3)
  2. TCP/IP connections (Type T) 

STEPS TO CREATE RFC CONNECTION

  1. Select 'Create' icon
  2. Provide RFC connection details
  • RFC Destination: RFC connection name
  • Connection Type: For example 3 or T
  • Description: Any short description, purpose of the connection
  1. Save the RFC connection

NOTE:
Once the RFC connection is saved, it will take us to the tab 'Technical Settings'.

Technical Settings
  • Load balancing
Select Yes, if load balancing is configured in system, else
Select No
  • Target host: Either Hostname or IP address of the target system
  • System Number: System number of the target SAP system

There are 5 tabs available, in which it is required to fill few of the target system details.

  1. Administration:

No input is allowed. It just provides the information on who created/modified the RFC and also the corresponding Date/time.

  1. Technical Settings: As explained above

  1. Logon and Security:

  • Language: Target system language, most of the time it's EN
  • Client: Target system client number 
  • User ID and Password: User details of Target system

NOTE: 
  • In general, RFC users can be of any user type
  • For security reasons, it is recommended to use only system users for RFC communications, to avoid access to dialog processes.

  • Security options:
  • Default setting for 'Trusted System' is 'No'.
  • If we need the Trusted RFC connection, select 'Trusted System' as 'Yes'.
  • This means, the trusted system doesn't need a password to connect with trusting system
  • Trusted system = calling system = Source system
  • Trusting system = called system = Target system

Some of the features of this option:
  • It provides Cross-system SSO (Single-Sign-On) capability
  • Password does not need to be sent across the network
  • User-specific logon details of the calling system is checked
  • Time-out mechanism for the logon data prevents mishandling of logon data

  1. MDMP & Unicode:

  • On a Non-Unicode system, the settings under this tab are disabled and no changes are allowed.
  • This setting is valid only on an UNICODE system, we have to specify the Unicode settings.

NOTE:
If the SAP system is upgraded from Non-Unicode to Unicode, we need to change the communication type to 'Unicode' on all the applicable RFC connections.

https://lh4.googleusercontent.com/JuwjOTT1OKLYYQa3u30VkOCTCycgvm1aOxFx8qHuKLmCfIufi0lVuwlPr9_Smr0q0_Py-fWGFgCtGSmz3zhRLEbUKxlt5QBCsrsHWaRuRDW_1KncyXpW6naenrLP98gdLxQ2K4a1U0rAGfa-lA

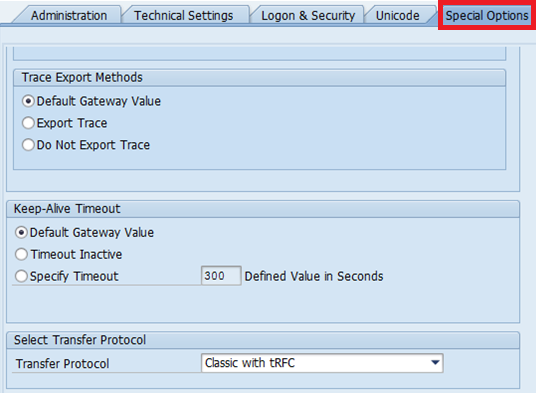
  1. Special Options:

This option is very rarely used.  For example

  • We can activate options for a trace and slow RFC connections.
  • To define qRFC


https://lh4.googleusercontent.com/sVK5mCWIdmP_C2SxFw7gZlSTbrjR-zVwHxEeNw6SgCgB5Oyoh2iInfxToSBY_FjerAhJSFiHKzDRN9jDjQqCr-q5Qz0mqanhdckl47fk0ZPeRtJqX-5UIavbv6tagGohs3TC7Nb7FDAKJSeDlg


TESTING THE RFC CONNECTION

  • Once all the necessary settings are made and the RFC connection is saved, final step is to make sure the connection is established successfully.
  • There are 3 types of connection tests are available.

  1. Connection test:    

This is the most important. This test is just to check if the calling system is able to reach the remote system. This authenticates the information provided in the RFC connection for target system.

  • If the connection is successful, it displays the table with response times. Else
  • An error will be displayed with the reason, and troubleshoot is required to fix the issue.

  1. Authorization Test:

This test validates the Client, User ID and Password (provided under 'logon and security' tab for the target system).

  • If the Authorization test is successful, it displays the table with response times. Else
  • An error will be displayed with the reason, and troubleshoot is required to fix the issue (check the logon details and authorizations)

  1. Unicode Test:

  • This checks if the Target system is an Unicode system or not

RELATED LINKS:


RFC COMMUNICATION TYPES IN SAP

There are 4 types of RFC communication in SAP
1.      Synchronous RFC
2.      Asynchronous RFC
3.      Transactional RFC
4.      Queued RFC

Synchronous RFC (sRFC) :   
In this type of RFC communication, the calling program waits until the requested processing step on the remote system has ended and then continues to work locally.
In other words, both the systems involved must be available at the time the call is made.

Used for
  • communication between systems
  • communication between SAP Web Application Server to SAP GUI
Asynchronous RFC (aRFC) : 
In this type of RFC communication, the calling program gives the request to the remote system and immediately continues to work locally. 
The requested processing step is executed on the remote system in isolation.
If the remote system cannot be reached at the time of the call, the asynchronous calls of the RFC client are lost.

Used for
  • communication between systems
  • For parallel processing
Transactional RFC (tRFC) :  
This type of RFC communication is similar to asynchronous RFC but by allocating a transaction id(TID)  it guarantees  that if a request is sent several times because of network problems  it is processed only once. 
Unlike asynchronous RFC,  in Transactional RFC the remote system does not have to be available at the moment the RFC client program start the call. 
The data is held in the source system until the target system is available.
The report program RSARFCSE is called in the background at regular intervals and tries to place the unsuccessful requests, identified by their transaction id again.

Used for
  • Extension of Asynchronous RFC
  • For secure communication between systems
Queued RFC (qRFC) :  
This RFC communication is an extension to the transactional RFC. 
In this method, all the requests are queued up(inbound queue and outbound queue) and are processed in a sequence only if it is certain that all preceding calls are processed correctly. 
This method guarantees that all the requests are processed in the sequence in which they are received.
This type of RFCs will be used in SCM (APO) systems for CIF queues etc where requests have to be processed in an order.

Used for
  • Extension of the Transactional RFC (tRFC)
  • For a defined processing sequence
  • Implementation of qRFC is recommended if you want to guarantee that several transactions are processed in a predefined order.

Important RFC tables and reports like RFCDES

Table RFCDES

It is the standard SAP table which stores the RFC destinations.
It describes logical destinations for remote function calls (RFCs).
We can't maintain the table RFCDES directly.

Simple advantage example of using table RFCDES

If password is changed for the user, the same has to be updated in the respective RFC connection under 'Logon and Security' tab in SM59.
As there are several RFCs and it might be difficult to find out in which RFC, the user being is used.
We can easily get the RFC name in SE16, instead of searching for it manually in SM59.
a)  SE16 --> RFCDES
b)  Enter the user name in 'RFC user' field.
The output contains the RFC name along the below parameters:
H = Target Host
S = Instance number
M = Client number
U = User name
V = Password

Monday, 12 September 2016

How to activate web services in SICF

  1. Login into the SAP system.
  2. Enter the Transaction SICF.
  3. If correct path for the service is know, paste it in the service path and execute else give the service name in the service name tab and execute.
  4. Right click on the respective service and activate.
  5. Test the connection finally.

Index creation in SAP

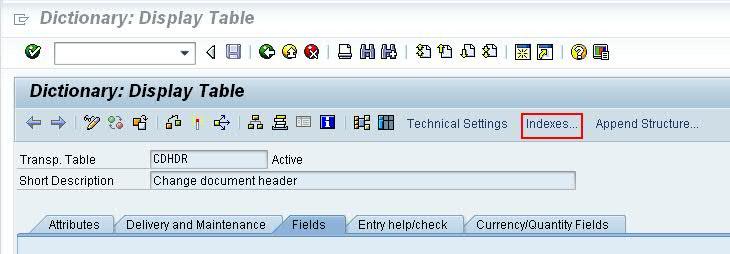
  • Go to the Transaction code SE11
C:\DOCUME~1\s1v5w7\LOCALS~1\Temp\$3D35FF46D68C8FB8.jpg 

  • Select Indexes…

C:\DOCUME~1\s1v5w7\LOCALS~1\Temp\$530B30B1FD59E13.jpg 

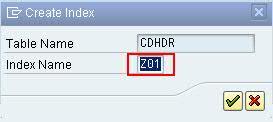
  • Select Create Index


C:\DOCUME~1\s1v5w7\LOCALS~1\Temp\$13806F43054F1D7A.jpg

  • Provide Index Name

C:\DOCUME~1\s1v5w7\LOCALS~1\Temp\$DA1C666FC670475.jpg 


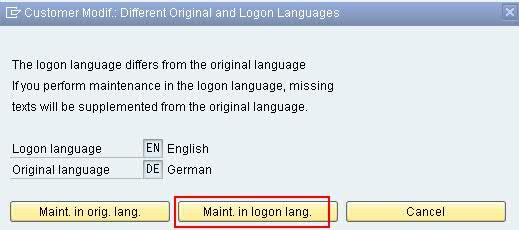
  • Select Maintenance language option

C:\DOCUME~1\s1v5w7\LOCALS~1\Temp\$4536D9E09E6096B8.jpg 


  • Provide Short Description and Field names


  • Save


  • Provide Transport request


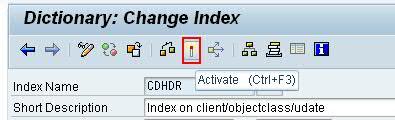
  • Index does not exist in database system ORACLE, hence Activate the Index

C:\DOCUME~1\s1v5w7\LOCALS~1\Temp\$463FAE33EC628DEA.jpg